General
With the purely inductive measuring system, maximum system accuracies up to +/-1um arc length can be realized.
The measuring system consists of a solid measure with absolute code as well as a measuring head with sensor and evaluation electronics. Depending on requirements, single or multi-head scanners are available. The measuring ring is mounted directly on the bearing inner ring.
The integrated measuring system is available for sizes 150 to 650. For some sizes, the overall height is greater than the standard bearing without measuring system (see product tables). The measuring head is mounted directly on the outer ring; it can be mounted radially or axially. When radially mounted, air gap adjustment is performed via the housing diameter of the outer ring, eliminating complex measurement gap settings.
Characteristics
Size and Encoding
- Available from size 150 to 650 mm
- Absolute encoding
Measuring Head
- Single and multi-head scanner options
- Multi-head scanning eliminates eccentricity and radial runout errors
Environmental Performance
- Dirt resistant IP67
- Resistant to magnetic interference fields
- Working temperature -10C to +100C
Control System Integration
- Suitable for high-speed applications
- Supports most CNC control system interfaces
- Direct cooperation with AMO for rapid connection
Absolute System Advantage: Position is known immediately on power-up, no reference travel required. The system continuously provides constant absolute position information to the control system.
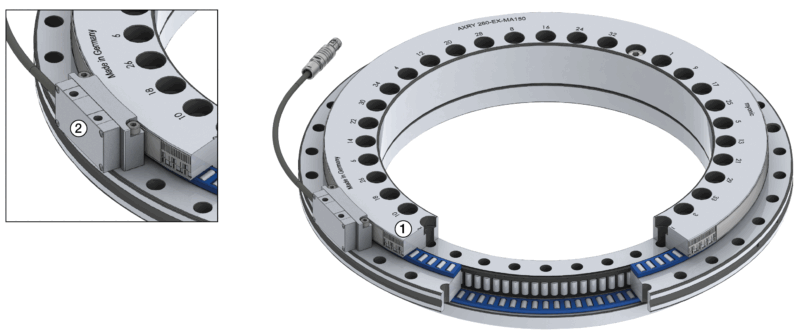
Single-Head Measurement (Axial)

| No. | Component | Description |
|---|---|---|
| 1 | AXRY-MA | Bearing with measuring ring |
| 2 | Measuring Head | Axially mounted inductive measuring head |
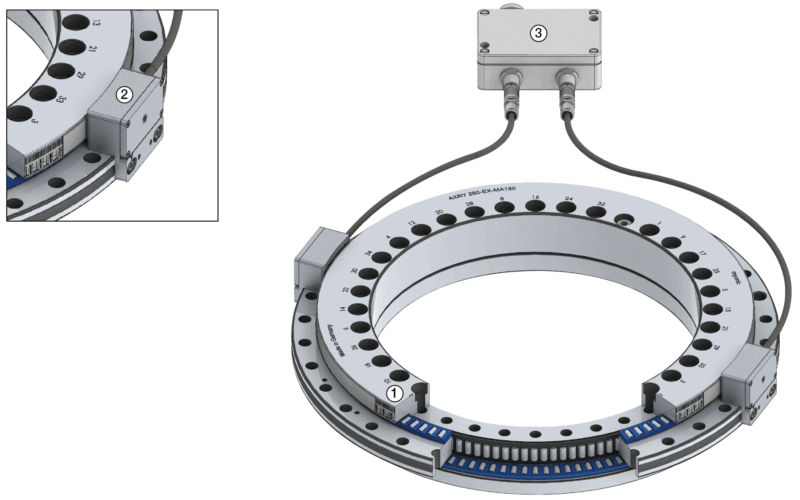
Double-Head Measurement (Radial)

| No. | Component | Description |
|---|---|---|
| 1 | AXRY-MA | Bearing with measuring ring |
| 2 | Measuring Head | Radially mounted inductive measuring head |
| 3 | MHSA Evaluation Electronics | Multi-head system absolute signal processing unit |
Radial Mounting Advantage: The measuring head is mounted on the housing surface of the bearing outer ring. This means the complex air gap adjustment between measuring head and measuring ring is no longer required.
Recommendation Distance Plates for Absolute Measuring Heads
If you want to mount the absolute measuring head directly to the bearing outer ring, a distance plate may be required. M4 threads at a spacing of 51mm are already present on the bearing outer ring. These threads are suitable for absolute measuring head attachment and distance plate mounting.
For the absolute measuring head to measure at the correct position, the distance DP-H must be adjusted using the distance plate.

DP-H: Distance plate height (for adjusting axial distance between measuring head and measuring ring)
| Bearing Model | Size Range | DP-H (mm) |
|---|---|---|
| AXRY | 180-395 | Distance plate not required |
| AXRY | 460 | 3 |
| AXRY | 580 | 3 |
| AXRY | 650 | 15 |
Note: For AXRY sizes 180-395, the absolute measuring head can be mounted directly without a distance plate.
MA vs MI System Comparison
| Characteristic | MA (Absolute) | MI (Incremental) |
|---|---|---|
| Maximum Accuracy | +/-1 um | +/-2 um |
| Position on Power-up | Immediately known | Reference travel required |
| Measuring Ring Height | 14 mm | 10 mm |
| Distance Plate Requirement | Only for large sizes | Required for all sizes |
| Radial Mounting | Simplified air gap adjustment | Distance plate required |